The CHEAPEST server ever, a Platform journey Vol.2
Table of Contents
You are provably aware of the current infrastructure and programming pattern I am building for this series a platform journey (I will cover extra details in future volumes). More specifically, we already discussed the limitations of it and the overall picture in Volume 1. Volume 2 will explain the thought process of building one of the cheapest components of the platform as well as the technical side of the application.
Since this article is a set of skills, from integration patters to CI/CD pipelines and secrets configuration. This TOC will help you to navigate through and skip the sections you already master.
Integration pattern
Nuxt, one of the most popular Vue frameworks for new web apps. One of the most important Nuxt configurations is the mode, as it determines how your app is built, deployed and served. There are three main types of web apps out there today:
- Classic Single-Page App (SPA)
- Universal/Isomorphic Web App (UWA)
- Pre-Rendered Single-Page App
Today we are going to focus on SPA. In a classic SPA, the HTML served to the client is relatively empty, and JavaScript dynamically renders HTML once it gets to the client.
One of the PROs for this mode is building static files, making it easy to deploy to a CDN (content delivery network).
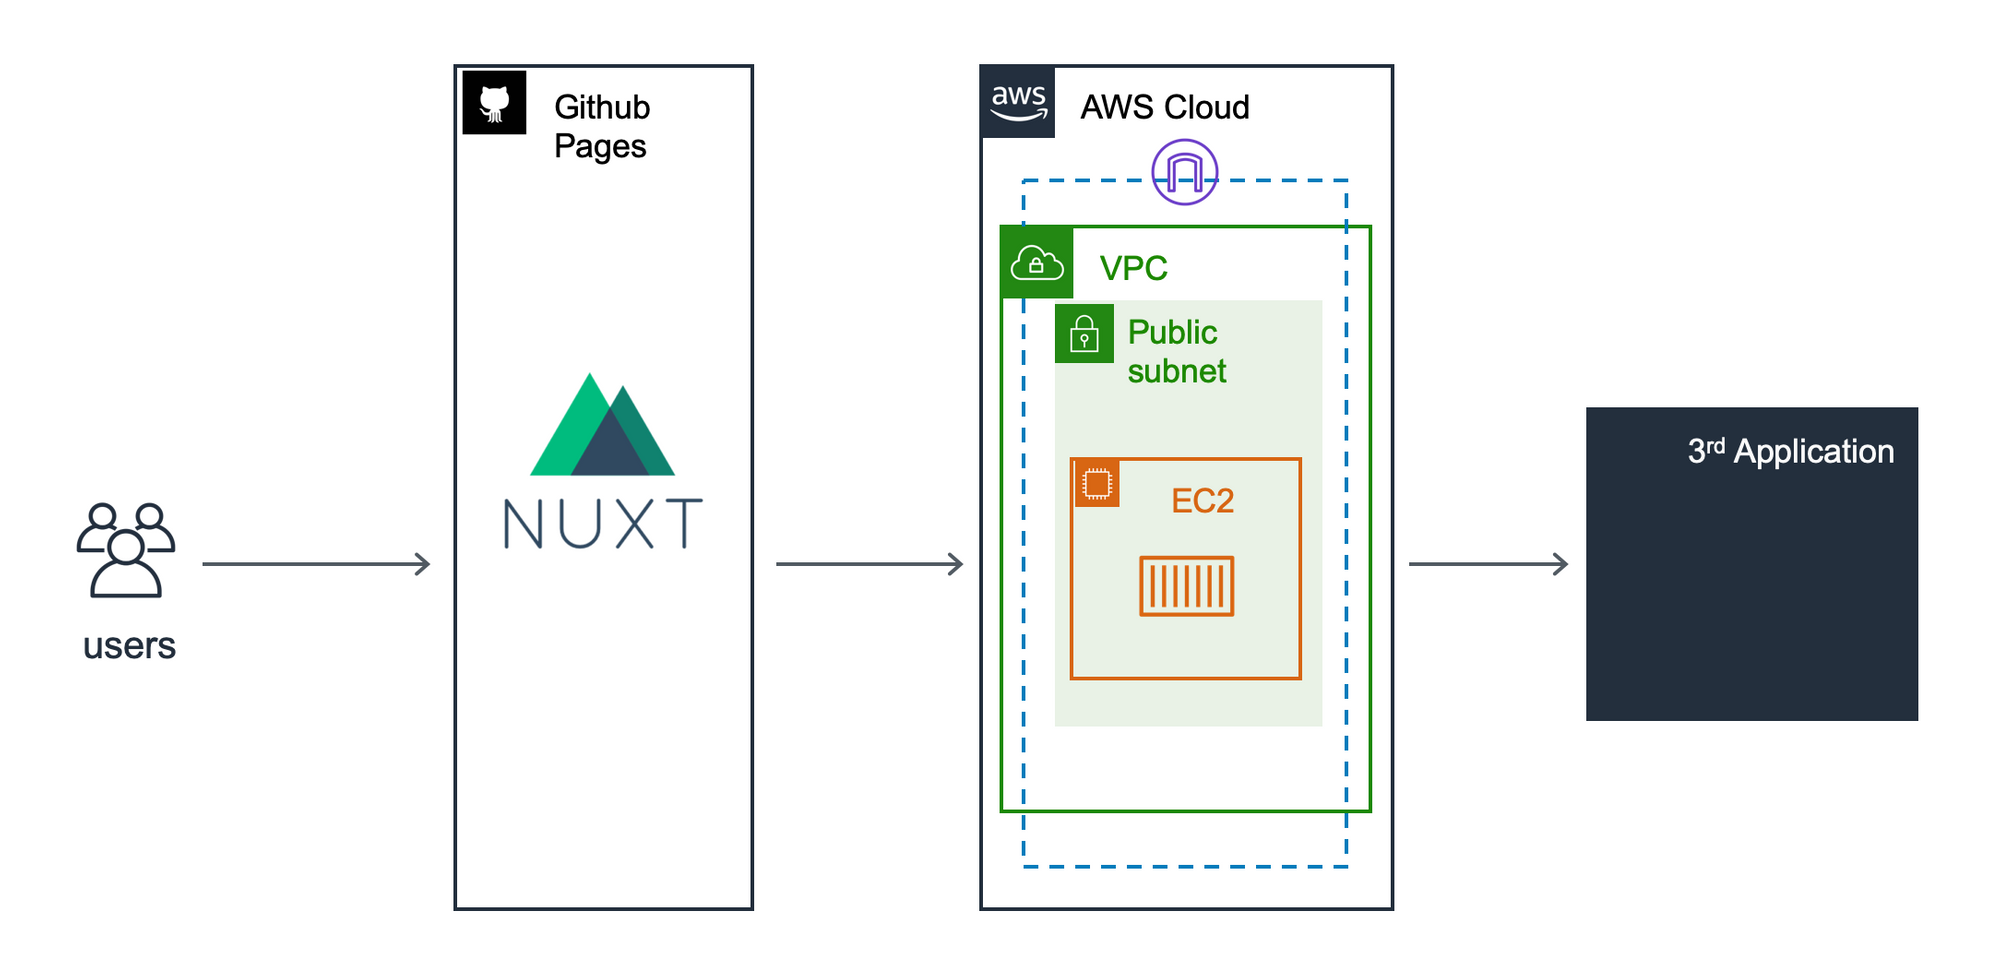
Github pages will serve a Single Page application. All the api calls will go through a Golang API REST server which may or may not have external dependencies to build the data model.
Setting the Github Token
Before going deep into the pipeline, let's create some important assets. You’ll need to generate a personal access token with the public_repo or repo scope (repo is required for private repositories).
Go to https://github.com/settings/tokens/new (Settings > Developer settings > Personal access tokens) and generate a new token.
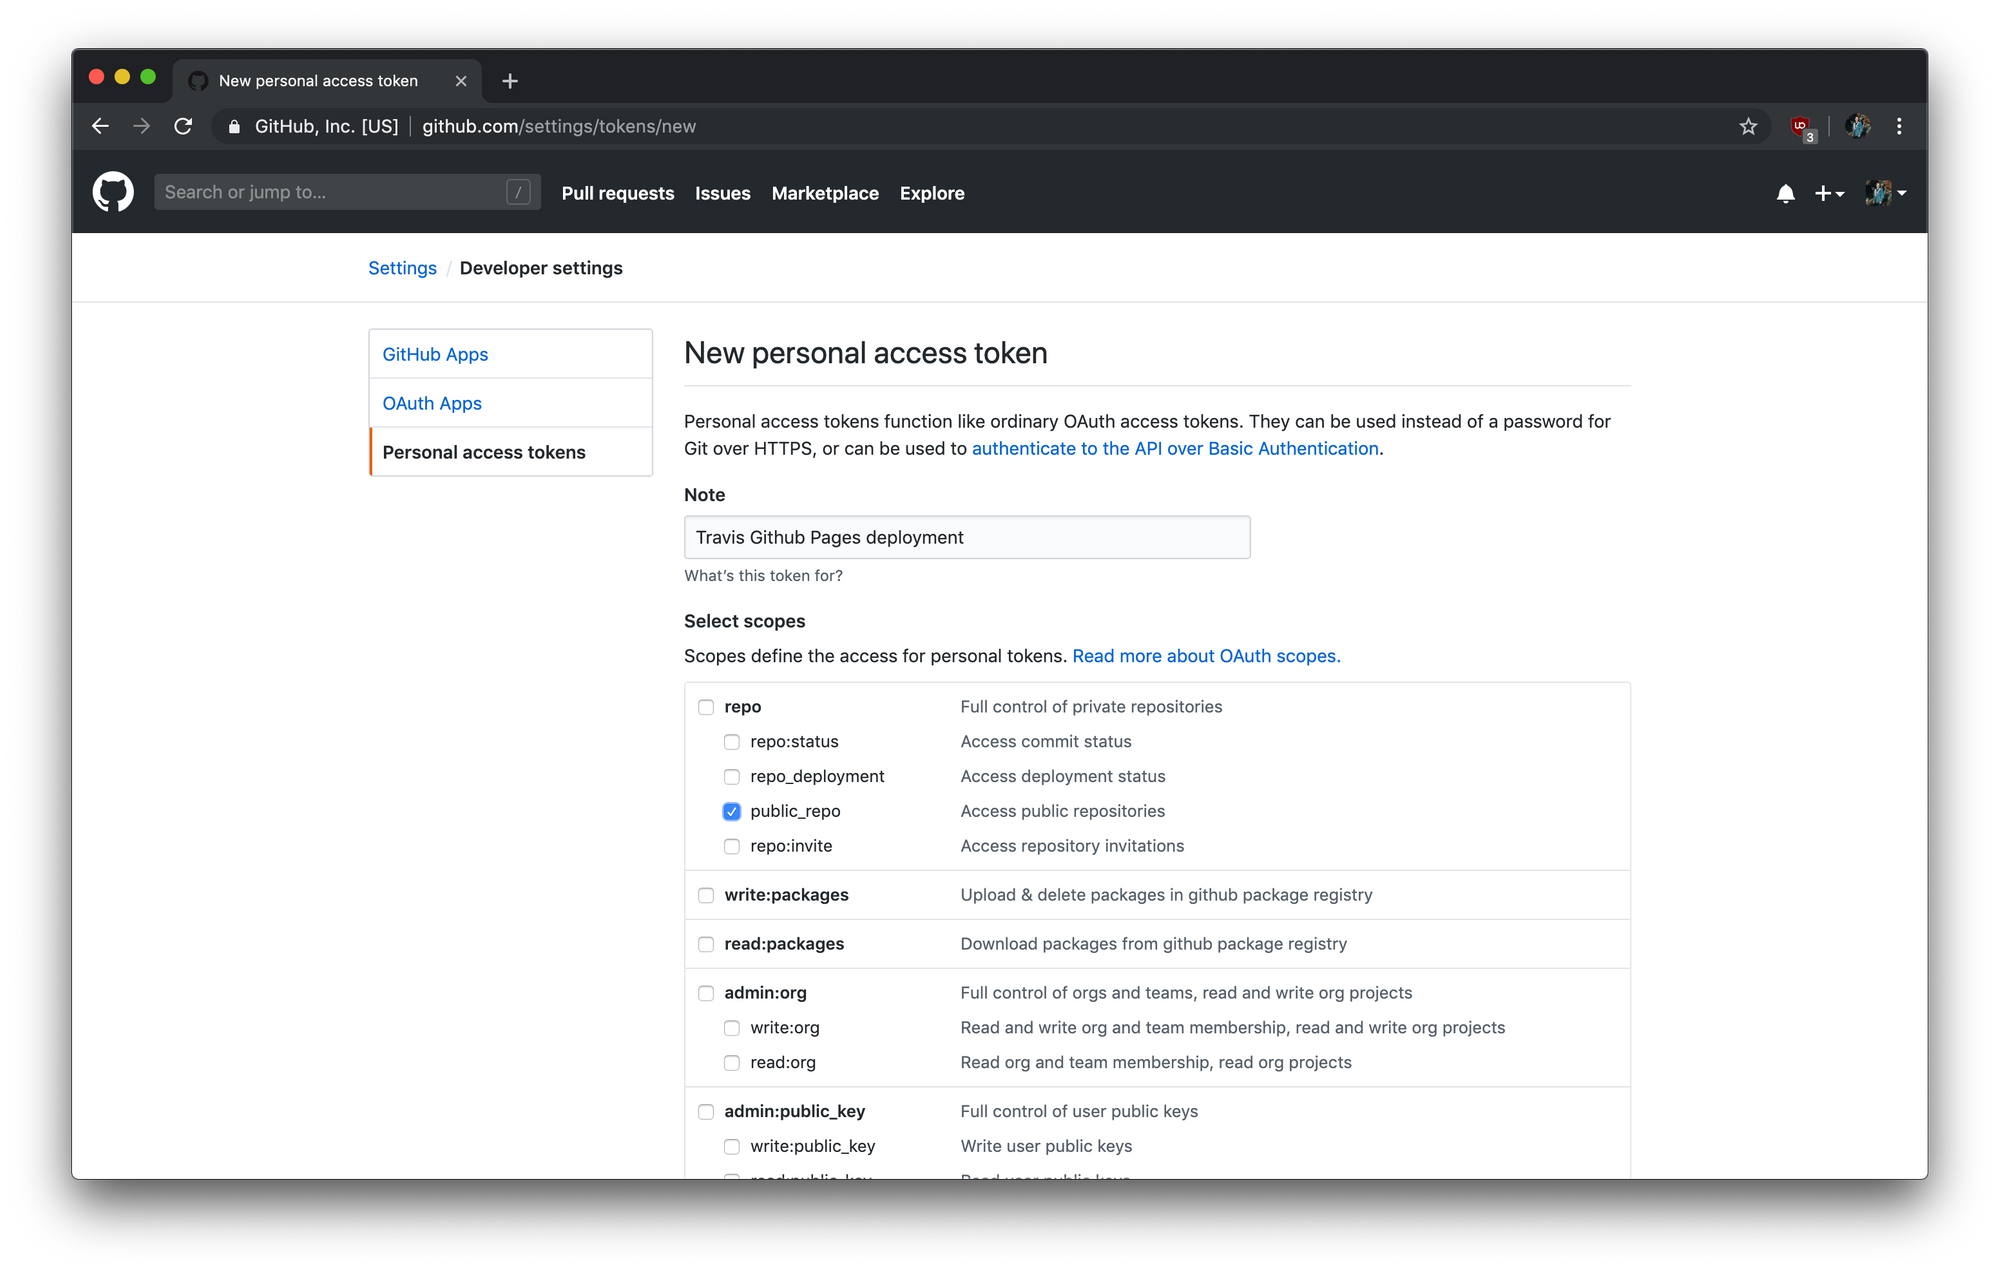
Since the token should be private, you’ll want to pass it to Travis securely in your repository settings or via encrypted variables in .travis.yml.
$ cd <repository-folder>

# login for travis.com
$ travis login --com

# secret for travis.com
$ travis encrypt --pro GITHUB_ACCESS_TOKEN=xxx --add

# secret for travis.org
$ travis encrypt --org GITHUB_ACCESS_TOKEN=xxx --add
Pipeline in Travis CI-CD
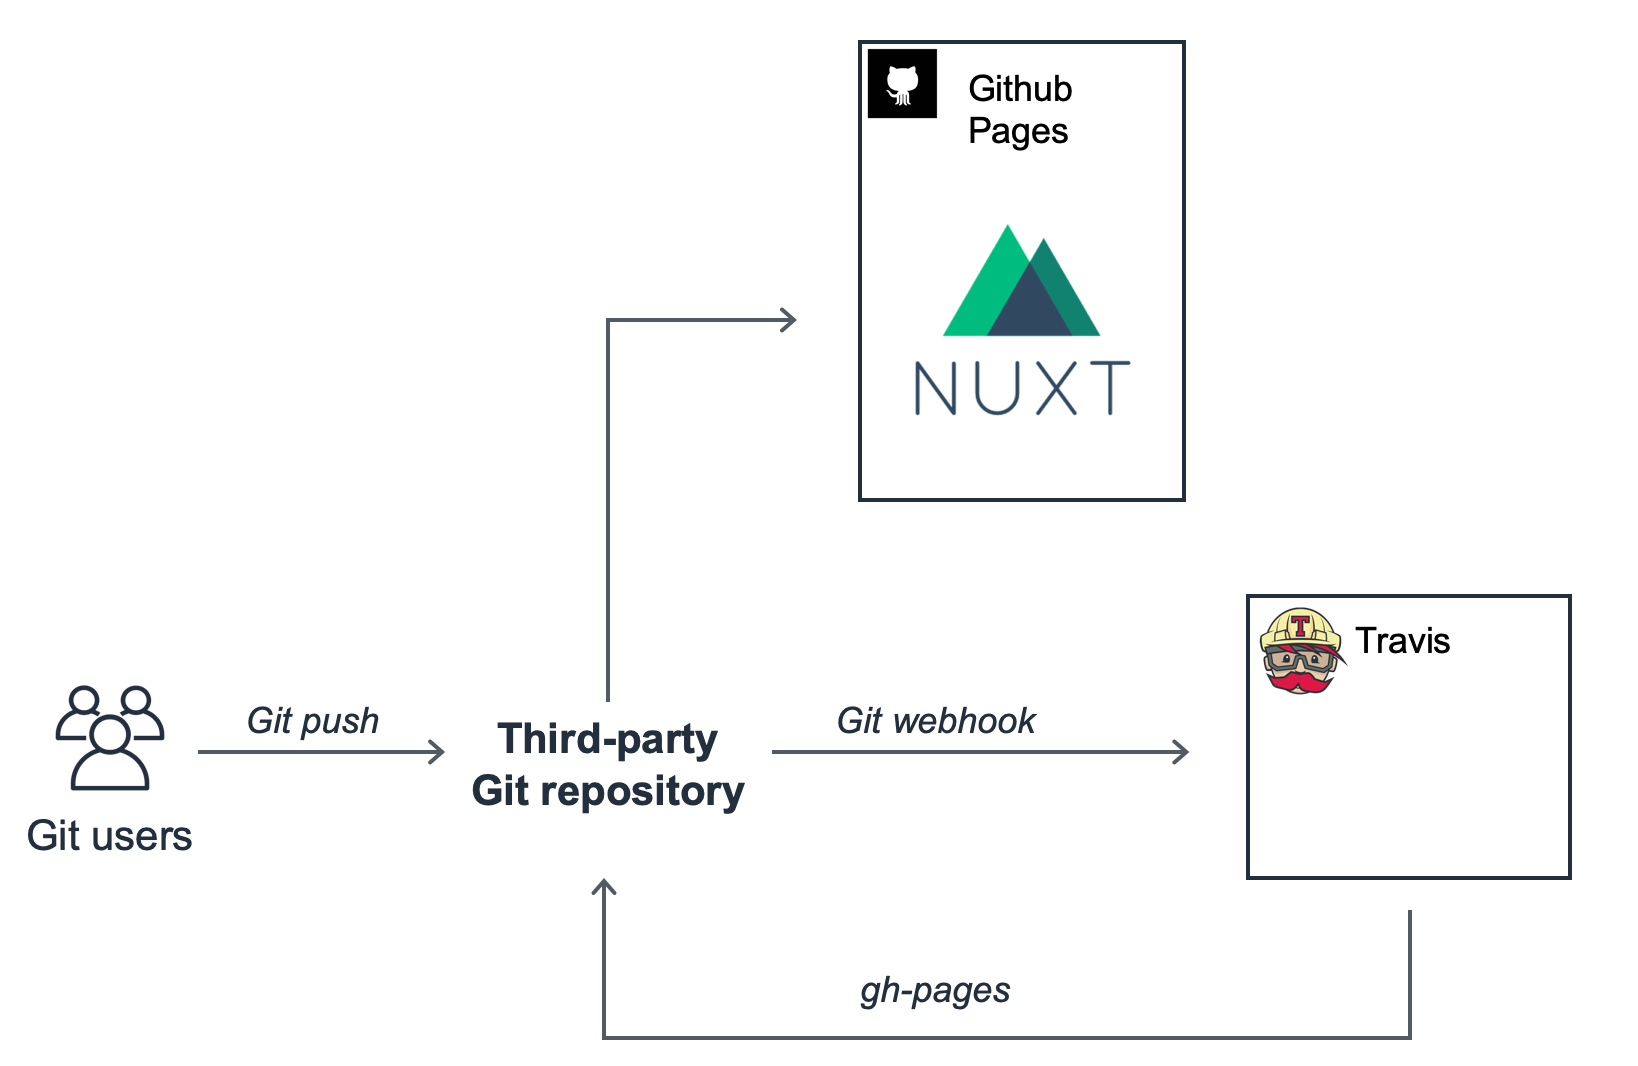
Travis CI can deploy your static files to GitHub Pages after a successful build. Depending on the Work Flow that fit your needs you might want to change the deployment branch. GitHub flow is a lightweight, branch-based workflow and you can know more about it in this article.
dist: trusty
language: node_js
node_js:
- '8'

env:
  global:
    secure: 5+tJXzbTwC6Q8A9XHifJODwOU4NHYsVpWdTzXKz4Ea/16a7hBeB5HUKyvJqy3Ld+3MzLSnIBZbXKYqB1a8ixtyYkzdLbIr0opbJVZcSR3q/3h5Gq1bw/FJsB5dFtjXip5DPvXATPcDCcZrghsoH831q7qt2segCjTIyeC4hWvPihCsKk/GxyzZaeJznLBQd3FXfEHziU3AhS5Krn+EzTlVtRRqi13In8mv0OGI9wGEeHHCA60GvvRDX1O+up8ttwCVWocWO/tsEGoYXdvaG7YYWtpgIplOzrEu0eN98nVHT+6HkBFuiSPazFiSPDYvwPsYjyq2mzPkuItcaOSbQxPYfmBYgcvqJoiD+uiNFgk5HeXBs+Tsj0r7VWsJ3HKp7V0lKFWgIUyaABdnzftAhDHGEwvovAqNCzTOr/0FM2omyDxJn6t5RyvevPugDVI2Twi57moCYVkY8ykyBDq45VQeYarTs2J8Vx5IxnYpzo6BSvRt8kN4xmcZ6IRxzEK05Q59THiI85xeiYwLaeIXmQ9rG211gyRmehxeKgDaRJm8lrFYwlpB/UCvlzp6sSGmGiJhpWUpXIAfrhLwoL7iEfAnB4oH1ZVTgVujAldhwIdwpcn1G5FQAhiKDVVG4uuu54cAVd6GpawFW3BTca9uP05t61rZFCliWYNglEwauOsCM=

cache:
  directories:
  - node_modules

branches:
  only:
  - master

install:
- npm install
- npm run generate

script:
# TODO: ADD your tests here
# - test

deploy:
  provider: pages
  skip-cleanup: true
  github-token: "$GITHUB_ACCESS_TOKEN"
  target-branch: gh-pages
  local-dir: dist
  fqdn: <DNS> # Optional, add the custom domain to the configuration of the Github pages
  on:
    branch: master
DNS management
Github Pages allows you to add custom domains, and since 2018 Let's Encrypt is available in the configuration.
We have partnered with the certificate authority Let’s Encrypt on this project. As supporters of Let’s Encrypt’s mission to make the web more secure for everyone, we’ve officially become Silver-level sponsors of the initiative.
If you are using CNAME or ALIAS records for your custom domain, you’re all set and your site should be accessible over HTTPS. If it is, and your site loads correctly over HTTPS, you can optionally enforce HTTPS in your repository’s settings. Users who request your site over HTTP will be upgraded to HTTPS.
In this section though we will cover the A records. Follow your DNS provider's instructions to create A records that point your custom domain to the following IP addresses:
- 185.199.108.153
- 185.199.109.153
- 185.199.110.153
- 185.199.111.153
We delegate to the CI/CD pipeline, add the custom domain to the configuration of the Github pages.
# Confirm that your DNS record is set up correctly
$ dig +noall +answer <DNS>

<DNS>.    1799    IN    A    185.199.111.153
<DNS>.    1799    IN    A    185.199.108.153
<DNS>.    1799    IN    A    185.199.110.153
<DNS>.    1799    IN    A    185.199.109.153
S3 vs Github Pages
First thing that come to my mind, and since the core of the platform is hosted on AWS, was deploying the frontend into a S3 bucket + Cloudfront + ACM (amazon certificate manager).
S3 is a static storage which can be configured for Static Site Hosting. Cloudfront is a CDN (content delivery network) and you can configure the cache time and availability zones you want to serve files from.
Cloundfront offers free HTTPS certs, in the other hand if you need a DNS customisation, ACM allow us to automate and renewal a SSL certificate for our custom domains for free.
In the end the cost will be in the Cloudfront side + a small fee from S3.
*Please calculate the cost by your own first.
Github Pages has a few limitations:
- lack of scalability
- only available for public repositories (7$ for private ones, more expensive than S3 solution)
- Low cache expires (GitHub sets the cache-control: max-age header to 600 seconds, or ten minutes)
For the sake of simplicity in the deployment, pipeline integration and isolation from the rest of the platform the Github Pages' constraints are a side effect that I'm willing to take.
S3 alternative with Terraform
I am aware we didn't talk about Terrform just yet, but let me share with you some snippets and overall picture of what TF can do for us.
Terraform enables you to safely and predictably create, change, and improve infrastructure.
# terraform.tfvars
bucket_name = "my-spa-<my-service-name>"
domain      = "<my-dns>"
# policy.json
{
"Id": "bucket_policy_site",
"Version": "2012-10-17",
"Statement": [
{
"Sid": "bucket_policy_site_main",
"Action": [
"s3:GetObject"
],
"Effect": "Allow",
"Resource": "arnundefineds3:::${var.bucket_name}/*",
"Principal": "*"
}
]
}# S3
resource "aws_s3_bucket" "spa" {
bucket = "${var.bucket_name}"
acl = "public-read"
policy = "${file("policy.json")}"
# Versioning is not needed and if it is enable the cost will increase
versioning {
enabled = false
}
# Prevent to destroy the S3 bucket on any update or purge
lifecycle {
prevent_destroy = true
}
website {
index_document = "index.html"
error_document = "index.html"
}
tags = {
Name = "SPA whereisjorge.today"
}
}# Cloudfront
resource "aws_cloudfront_distribution" "spa" {
origin {
domain_name = "${aws_s3_bucket.spa.bucket_domain_name}"
origin_id = "${var.bucket_name}"
}
enabled = true
is_ipv6_enabled = true
default_root_object = "index.html"
aliases = ["${var.domain}"]
}# ACM
resource "aws_acm_certificate" "my-acm" {
domain_name = "${var.domain}"
subject_alternative_names = [
"${var.domain}",
"www.${var.domain}"
]
# Check the ACM documentation on how to validate your DNS
validation_method = "DNS"
lifecycle {
create_before_destroy = true
}
}
# We will skip the validation of the acm since my DNS provider doesn't have an automatic provider/free API to add new records.
# NAMECHEAP really?